반응형
로지스틱 회귀는 이진분류에서 사용되는 모델 중 흔히 쓰이는 모델이라고 보면 된다. 이론적인 부분을 공부하고 싶다면 여기를 눌러서 들어가면 볼 수 있다. 나는 임의로 데이터를 생성하여 분석을 진행했기 때문에 모델의 성능이 좋게 나오지는 않았다. 공식 데이터를 가지고 분석을 수행하면 보다 좋은 결과를 도출할 수 있을 것이다.

def sigmoid(z):
    return 1/(1+np.exp(-z))

def f(x, w, b):
    return np.dot(x, w)  + b

def df(x, w, b):
    return x, 1

def binary_cross_entropy(z, t):
    return -(t*np.log(z) + (1-t)*np.log(1-z)).mean()
분석을 진행하기 앞서 로지스틱의 수식(sigmoid)을 만들고, 각 미분값을 구하는 함수를 설정했다. 그리고 loss function은 cross entropy를 사용했다.
fitW, fitB = np.random.rand(5, 1), np.random.rand(1)
bestW, bestB = fitW, fitB
eta = 5e-5
bestLoss = 350
epochs = 250
bestepoch = 0
# target_col = ['Lepton_pt', 'Jet_pt']
train_loss_total, eval_loss_total = [], []

for epoch in range(epochs):
    train_loss, eval_loss = 0.0, 0.0

    for i in range(len(x_train)):
        x = x_train_ary[i]
        label = y_train_ary[i]

        z = f(x, fitW, fitB)
        z = sigmoid(z)
        loss = binary_cross_entropy(z, label)

        gradW, gradB = df(x, fitW, fitB)

        gradW = ((label-z) * gradW).mean()
        gradB = ((label-z) * gradB).mean()

        fitW += gradW*eta
        fitB += gradB*eta

        train_loss += loss
    train_loss_total.append(train_loss)


    for i in range(len(x_eval)):
        x = x_eval_ary[i]
        label = y_eval_ary[i]

        z = f(x, fitW, fitB)
        z = sigmoid(z)

        loss = binary_cross_entropy(z, label)

        eval_loss += loss
    eval_loss_total.append(eval_loss)
    if eval_loss_total[-1] < bestLoss :
        bestLoss = eval_loss_total[-1]
        bestW, bestB = fitW, fitB
        bestepoch = epoch

    if (epoch + 1) % 5 == 0 :
        print(f'epoch { epoch + 1 }, train loss : {train_loss:.4f}, eval loss : {eval_loss:.4f}, best Loss {bestLoss:.4f}, best epoch {bestepoch}')
코드는 한 번 값을 계산한 후 기울기에 학습률 만큼 이동하면서 오차를 갱신해가는 방식으로 진행하였고, 가장 좋았던 값을 저장하여 그 값을 최종 값으로 설정했다.
logit = f(x_test_ary, bestW, bestB)
y_pred =  [1 if x > 0.5 else 0 for x  in sigmoid(logit)]

accuracy = (y_pred == y_test_ary).sum() / len(y_test_ary)
print(f'accuracy(%) : {accuracy*100:.4f}')
# accuracy(%) : 68.0217
임의로 데이터를 만들어서 했더니.. 68% 정도 나온다. 찍은 것 보다는 잘 나오긴 했지만 딱히 마음에 드는 정확도는 아니다..ㅠ

from sklearn.linear_model import LogisticRegression

model = LogisticRegression(max_iter=1000)
model.fit(x_train_ary, y_train_ary)


y_pred = model.predict(x_test_ary)
accuracy = (y_pred == y_test_ary).sum() / len(y_test_ary)
print(f'accuracy : {accuracy*100:.4f}%')

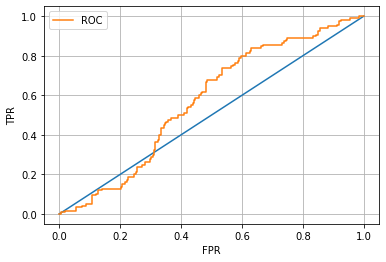
from sklearn.metrics import roc_curve
positive = model.predict_proba(x_test_ary)[:, 1]

fprs, tprs, thresholds = roc_curve(y_test_ary, positive)

plt.plot([0, 1], [0, 1])
plt.plot(fprs, tprs, label = 'ROC')
plt.xlabel('FPR')
plt.ylabel('TPR')
plt.grid()
plt.legend();
이렇게 위에서 장황하게 미분하고 계산하고, 학습률만큼 이동하고... 뻘짓을 해도 사이킷-런에서는 단순히 몇 줄 코딩으로 값을 산출해준다. 이렇게 편리한 패키지이다.
from sklearn.linear_model import LogisticRegression, LinearRegression
from sklearn.ensemble import RandomForestClassifier, GradientBoostingClassifier, AdaBoostClassifier, RandomForestRegressor
from sklearn.naive_bayes import BernoulliNB
from sklearn.svm import SVC
from sklearn.neural_network import MLPClassifier

logit = LogisticRegression()
rf_cf = RandomForestClassifier()
naive = BernoulliNB()
gb = GradientBoostingClassifier()
ada = AdaBoostClassifier()
svc = SVC(probability=True)
mlp = MLPClassifier()

model_accuracy = []
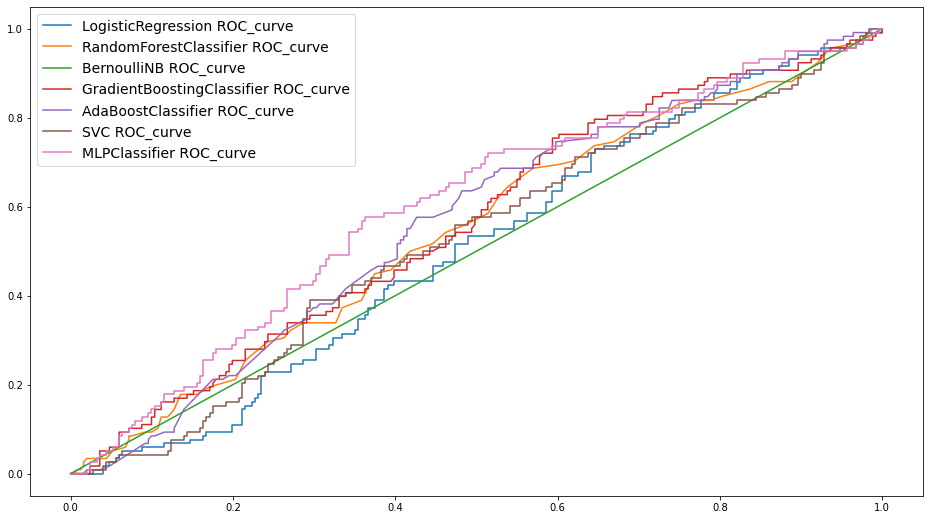
plt.figure(figsize = (16, 9))
for model in [logit, rf_cf, naive, gb, ada,svc,  mlp]:
    model.fit(x_train_ary, y_train_ary)
    y_eval_pred = model.predict(x_eval_ary)
    y_eval_score = model.score(x_eval_ary, y_eval_ary)
    y_test_score = model.score(x_test_ary, y_test_ary)
    model_name = str(model).split('(')[0]
    model_accuracy.append([model_name, y_eval_score, y_test_score])

    positive = model.predict_proba(x_test_ary)[:, -1]

    fprs, tprs, thresholds = roc_curve(y_test_ary, positive)
    plt.plot(fprs, tprs, label = model_name + ' ROC_curve')
plt.legend(fontsize = 14);
사이킷-런에 있는 각 모델들을 한 번 전체적으로 그려보았다.

결론: 사이킷-런 쓰자.
'Python > Scikit-learn' 카테고리의 다른 글
| [Python] Scikit-learn에서 cross validation 사용하기 (0) | 2022.01.14 |
|---|